1 Enqueuer


![]()
![]()

1.1 Docs
1.1.1 Welcome
Be our guest and have fun.
1.1.1.1 install it
First things first, let's get the enqueuer installed on your machine.
npm install --global enqueuer
Alright, it's time to create a task file. Something like:
#enqueuer-repo-hit.yml
actuators:
-   type: http
    url: https://github.com/enqueuer-land/enqueuer
    onResponseReceived:
        assertions:
        -   expect: statusCode
            toBeEqualTo: 200
Pretty simple, hum? Small and concise, how it should be! Run it:
enqueuer enqueuer-repo-hit.yml
Now you know how to hit a http server. What if I want to mock a http server response, you may ask. Not a big deal for enqueuer lovers:
timeout: -1
sensors:
-   type: http
    timeout: -1
    name: mock endpoint
    endpoint: /readme-example
    port: 9085
    method: POST
    response:
        status: 200
        payload: mock response
    onMessageReceived:
        assertions:
        -   expect: body
            toContain: "'enqueuer'"
Now go ahead and try hitting it using the browser.
Tip: remove timeout values and check what happens.
I told you it was simple.
Yes, of course you can hit your own mocked http server:
actuators:
-   type: http
    url: http://localhost:23075/resource
    method: POST
    payload: enqueuer
    onResponseReceived:
        assertions:
        -   expect: statusCode
            toBeGreaterThan: 400
        -   expect: body
            toBeEqualTo: "'blah'"
sensors:
-   type: http
    endpoint: /resource
    port: 23075
    method: POST
    response:
        status: 444
        payload: blah
    onMessageReceived:
        assertions:
        -   expect: body
            toContain: "'queue'"
Now, let's say you want to mix different protocols to test a bit more complex flow. How about publishing an amqp message and making sure that, once a service consumes that message an endpoint of your is hit? In order to achieve that, we have to make use of a plugin, given that amqp support is provided by a plugin. In this scenario, we're talking about the amqp plugin. Once we get this [plugin installed](#plugins installation) we are able to create and run files like this:
actuators:
-   type: amqp
    payload: 123456
    exchange: enqueuer.exchange
    routingKey: enqueuer.readme.routing.key
sensors:
-   type: http
    endpoint: /polyglot-flow
    port: 8080
    method: GET
    response:
        status: 200
        payload: polyglot message
    onMessageReceived:
        assertions:
        -   expect: body
            toContain: 123456
Now go nuts! It's all yours. Have fun. If you want more examples about "'http'", consider looking at this test. Check this out, you'll find countless examples. Certainly one is what you need.
1.1.1.2 if you need more
$ nqr -h

Usage: index [options] [test-files...]

Take a look at the full documentation: https://enqueuer.com

Arguments:
test-files                                other files to be tested

Options:
-v, --version                             output the current version
-b, --verbosity <level>                   set verbosity (choices: "trace", "debug", "info", "warn", "error", "fatal", default: "warn")
-c, --config-file <path>                  set configurationFile
-d, --show-explicit-tests-only            show explicit tests only (default: false)
-o, --stdout-task-output           add stdout as task output (default: false)
-m, --max-report-level-print <level>      set max report level print
-i, --show-passing-tests                  show passing tests
-s, --store [store]                       add variables values to this session (default: [])
-l, --add-plugin [plugin]                 add plugin
-e, --parsers-list [parser]               list available object parsers
-q, --parallel                            should run tests files parallely (default: false)
-f, --formatters-description [formatter]  describe report formatters (default: false)
-p, --protocols-description [protocol]    describe protocols (default: false)
-t, --tests-list [expectedField]          list available tests assertions (default: false)
-u, --loaded-modules-list                 list loaded modules (default: false)
-h, --help                                display help for command

Examples:
$ nqr --config-file config-file.yml --verbosity error --store key=value
$ enqueuer -c config-file.yml test-file.yml another-test-file.yml -b info
$ enqueuer test-file.yml --store someKey=true --store someOtherKey=false
$ nqr --protocols-description -s key=value
$ nqr -t expect
$ nqr -l my-enqueuer-plugin-name -p plugin-protocol
$ nqr -p http
$ nqr --formatters-description json

Contributing:
https://github.com/enqueuer-land/enqueuer
1.1.2 Components
In order to accomplish more than just hitting enqueuer's repo or doing a quick self http hit, there are a few things that you'll probably need to know. Don't worry, it's not too much and, as mentioned earlier, there is a lot of examples here, just in case. There are only three important component concepts: tasks, actuators and sensors. They work along with each other and are responsible for the full behavior of enqueuer.
1.1.2.1 task
Test scenario description. It tells what, when, and how test your applications and services. Picture it as if it was a collection of actuators, sensors and other tasks. It helps because this is exactly what it is. As the others components, it has some attributes. All of them are optionals. And it supports multi-level test scenarios out of the box. Yeap, go as recursive as you want. Every test file is a task. You don't know some of these attributes values yet? Don't worry, just put a variable there and let enqueuer replace it with the value you set later. Variable replacements are available through the entire task.
1.1.2.1.1 task attributes
These are the task attributes:
name
Describes what the task is suppose to do.
Defaults to task index.
name: task action
timeout
Defaults to 5000.
Sets in milliseconds how long the task waits to expire.
Set to zero or less than zero to run it endlessly.
timeout: 3000
delay
Defaults to 0. Sets in milliseconds how long the test waits before starting. Check this to get the full idea.
delay: 0
iterations
Defaults to 1. Sets how many times this test will be executed. Check this and this to get the full idea.
iterations: 3
id
Defaults to an auto-generated one. Uniquely identify this component among the others. It gets implicitly set by enqueuer if it is not set initially.
id: ID-0123456789
ignore
Defaults to false. Tells to enqueuer that this tasks should be skipped. Check this to see it working.
ignore: true
parallel
Defaults to false. Immediate children tasks should be executed in parallel mode.
Take a look at this to see it working.
parallel: true
import
Allows task to be dynamically defined, be it by loading an external file or creating dynamically by other tasks. Want to reuse the same task multiple times? This is you you need.
Take a look at this to behold this feature.
import: path/to/another/task/file
actuators
List of actuators. They're executed simultaneously, therefore, the order is irrelevant.
actuators:
- name: some actuator name
  type: http
- type: tcp
sensors
List of sensors. They're executed simultaneously, therefore, the order is irrelevant.
sensors:
- name: some sensor name
  type: udp
- name: another sensor name
  type: file
tasks
A list of child scenarios. List of tasks.
By default, they're executed sequentially, therefore, the order is relevant.
Unless the parallel attribute is set to true, what makes them get executed simultaneously,
Check this example, it may help.
tasks:
- name: some task name
  iterations: 2
- name: another task name
  delay: 200
1.1.2.1.2 events
Tasks have onInit and onFinish events.
Available events are described here. A this object is available to access and change task attributes.
name: my name
onInit:
  script: this.delay = 3000;
  assertions:
  - expectToBeDefined: this.name
onFinish:
  assertions:
  - expectToBeDefined: this.name
1.1.2.2 actuator
An actuator action is triggered by enqueuer itself. It acts whereas a sensor reacts. It publishes something, it writes, it enqueues, hits an endpoint... These kinds of actions. It's worth noting that it always creates a message. That's the reason why there's an implicitly created test in onFinish hook verifying if the message got published.
1.1.2.2.1 actuator attributes
Every actuator has its own properties, depending on its protocol and implementation.
The built-in http actuator implementation, for instance, demands a url, a method, and a payload, if the method is not a GET.
On the other hand, the built-in tcp actuator implementation requires a serverAddress and a port.
These are the actuator attributes:
name
Defaults to actuator index.
Describes what the actuator is supposed to do.
name: actuator action
type
Mandatory. Key tag to identify which actuator will be instantiated
type: http
payload
Since a actuator usually publishes something, it's very likely you have to set a value here.
The message itself that will be send through this protocol. Be it a string, a number, a boolean value or even whole objects.
payload: value
ignore
Defaults to false. Tells to enqueuer that this actuator should be skipped. Check this to see it working.
ignore: true
id
Defaults to an auto-generated one. Uniquely identify this component among the others. It gets implicitly set by enqueuer if it is not set initially.
id: ID-0123456789
1.1.2.2.2 actuator events
Available events are described here. A this object is available to access and change actuator attributes.
Depending on the protocol and its implementation, such as http and tcp, there may exist custom events, such as onResponseReceived event and an attribute message passed to it.
On the other hand, an asynchronous protocol, like: udp and amqp, usually do not provide it.
onInit:
  script: this.ignore = false
  assertions:
  - expectToBeDefined: this.type
onResponseReceived: #Provided in synchronous protocols
  assertions:
  - expectToBeDefined: message
onFinish:
  assertions:
  - expectToBeDefined: this.type
1.1.2.3 sensor
A sensor is an "under demand" event. It reacts whereas a actuator acts. It consumes something, it reads, it dequeues, gets hit... These kinds of actions. This means that it is not triggered by enqueuer itself. Rather than that, enqueuer waits on an external event to be triggered and then it asserts against the message that was passed to the sensor. It's worth noting that it always receives a message. That's the reason why there's an implicitly created test in onFinish hook verifying if a message got received.
1.1.2.3.1 sensor attributes
Every sensor has its own properties, depending on its protocol and implementation.
The built-in http sensor implementation, for instance, demands an endpoint, a method, and a port, if the method is not a GET.
On the other hand, the built-in tcp sensor implementation requires only a port.
These are the sensor attributes:
name
Defaults to sensor index.
Describes what the sensor is supposed to do.
name: sensor action
type
Mandatory. Key tag to identify which sensor will be instantiated
type: http
avoid
Identifies whether or not this sensor should not receive any message. Defaults to false.
If set and a message is received a failing test will be generated.
Take a look at this to see it working.
On the other hand, when it's false and no message is received in a given timeout. The sensor is valid.
avoid: false
timeout
Sets in milliseconds how long the sensor waits to expire. Defaults to 3000.
Set to zero or less than zero to run it endlessly.
timeout: 3000
ignore
Defaults to false. Tells to enqueuer that this sensor should be skipped. Check this to see it working.
ignore: true
id
Defaults to an auto-generated one. Uniquely identify this component among the others. It gets implicitly set by enqueuer if it is not set initially.
id: ID-0123456789
1.1.2.3.2 sensor events
Available events are described here. A this object is available to access and change sensor attributes.
onInit:
  script: this.avoid = false;
  assertions:
  - expectToBeDefined: this.type
onMessageReceived:
  assertions:
  - expectToBeDefined: message
onFinish:
  assertions:
  - expectToBeDefined: this.type
1.1.3 Event
Events are hook methods executed by enqueuer when something happen on actuators, sensors or tasks.
This is where you'll write your tests. In its assertions field.
There will be a variable called this and, depending on the event's owner, it has an alias actuator, sensor or task.
You're free to explore them however you want, even doing things like this:
actuator.parent.sensors[0].timeout = 1000;
1.1.3.1 hooks
Every component has at least two hook events available:
onInit
Available in tasks, actuators and sensors. It gets executed as soon as the component is initialized.
As available parameter, an elapsedTime variable is given, counting every millisecond since the instantiation of this component.
onFinish
Available in tasks, actuators and sensors. It gets executed when the component is about to finish.
As available parameter, an elapsedTime variable is given, counting every millisecond since the instantiation of this component. The onFinish hook also provides the argument executedHooks. A list of strings enumerating which hooks were executed by the componen
Actuators and sensors also provide custom hooks. Check their documentation to find which ones are available and what arguments they provide.
custom
Depending on the protocol implementation/library/author's mood, the actuator/sensor may have additional hooks.
Such as onError, onResponseReceived, onFileNotFound and onRedirect...
Http-proxy sensor test file is an excellent example, check it out.
A good way to identify that is to run the following command line nqr -p <type>. Like:
nqr -p http
available variables Given that the variables and theirs names may vary according to the scenario, it's interesting to have a special one to retrieve every argument passed to the hook. To retrieve that information, you can use "'argumentNames'" as a regular argument. So, let's say you have this task:
onFinish:
  script: console.log(argumentNames)
You'd get this printed out to the console:
[ 'task', 'elapsedTime', 'executedHooks' ]
1.1.3.2 fields
Every hook object has 4 properties:
script
Javascript code snippet executed when the event is triggered.
Yeah, I mean it. See it it by yourself.
Be careful, with great power comes great responsibility.
debug A boolean value that prints to the console the available arguments and their respective values.
store
Data to be persisted across tasks.
assertions
Array of assertions.
Run $ nqr -t to see available ones.
Consider looking at this test example.
Of course, just like almost everything else in enqueuer world, you can extend this available list using some plugin.
You can check them out or even write your own.
onInit:
  script: variableIdentifier = 'string value'

  assertions:
  - expect: variableIdentifier
    toBeEqualTo: "'string value'"

onMessageReceived:
  script: |-
    message += 3;
    console.log("'Message received plus 3 is: ${message}'");

  store:
    key: message

  assertions:
  - name: anyValue #optional
    expect: message
    toBeEqualTo: store.key
  - expect: message + 3
    toBeGreaterThan: 3
1.1.3.3 event example
Check this test file to see it in practice.
1.1.4 Task Flow
Now you know what are tasks, actuators, sensors and events. How about seeing how they interact with each other in a fancier way?

1.1.5 Configuration File
To save yourself some time, a configuration file may be used. Configuration files tell enqueuer which tests will be executed, log-level, and which output test report files should be generated. This file tells how enqueuer should be executed. To run enqueuer with the configuration:
nqr -c path/to/configuration/file.yml
or
nqr --config-file path/to/configuration/file.yml
1.1.5.1 attributes
These are the configuration file attributes:
files
Task file names or glob. Enqueuer runs every file that matches an element value.
files:
- 1.yml
- 2.yml
- *.json
parallel
Defaults to false. Task files should be executed in parallel mode. The task file itself is still sequential, but the files are executes in parallel.
parallel: true
log-level
Defaults to warning. Defines how information are logged in the console. Accepted values are: trace; debug; info; warning (default); error; and fatal.
log-level: trace
max-report-level-print
Defaults to 1. The deepest level of report to be printed to the console.
max-report-level-print: 2
plugins
List of in plugins used by the test scenarios. You can check them out or write your own.
plugins:
- enqueuer-plugin-amqp
- enqueuer-plugin-ws
- enqueuer-plugin-mqtt
- enqueuer-plugin-html-report
outputs
Once enqueuer runs every execution, it compiles a summary and sends it to every actuator listed in output.
An important thing to note is that every available report actuator is available here.
Yes, it means that you are able to send this report through http, tcp, etc. or through a plugin or a custom one.
You can run $ nqr -p to check available report actuators installed.
Another important thing to note is the format value. By default a json summary is generated, but you can change it to whatever format you would like, such as: Xunit, html
You can run $ nqr -f to check available installed formats or even write your own
outputs:
- type: file
  format: json (default)
  filename: output/examples.json
- type: file
  format: yml
  filename: output/examples.yml
- type: standard-output (default)
  format: console
store
Values defined here use the 'key: value' pattern and are available to every test scenario throughout the entire execution
store:
  variableKey: "my value" # Defines 'variableKey' key and its value 'my value'.

  'separated key': 6

  object: # You can even define whole objects here:
    first: first value
    second:
      nested: thing
1.1.5.2 example
Here's a complete example of a configuration file.
1.1.6 Variables
Providing power and flexibility, enqueuer allows you to use variables placeholder replacement.
That's why there is a store field and you'll see a lot of << and {{ being used in the examples files.
It works as simple as this:
name: my name is <<variableKey>>
Every time enqueuer sees these kind of notations, it searches in its store for a key/value pair like:
variableKey: "'enqueuer'"
Then, when enqueuer parses the original map, it gets translated to this:
name: my name is enqueuer
By default, every ENV_VAR set is loaded automatically to the store. Check this example.
1.1.6.1 set a variable
There are a few ways to set a value in the store.
1.1.6.1.1 configuration file
Configuration file store object. Set it as you wish, as you can see here
1.1.6.1.2 command line
A command line argument using the key=value format. This way:
nqr --store key=value -s anotherVariable=true
1.1.6.1.3 event set variable
Dynamically set it through any event. Be it in its script field or straight through its store field. Both ways work:
onInit:
    script: store.key = 123;
    store:
        anotherKey: "'another Value'"
1.1.6.2 use a variable
There are two ways two use a variable:
1.1.6.2.1 non-js code snippet
The easiest one is to type <<variableKey>> or {{variableKey}} where you want it to be replaced in a test file, as you can see here
1.1.6.2.2 js code snippet
Using the store object. It's attributes are the keys and their values are their respective values.
Therefore, you're free to use store.variableKey, console.log(store.variableKey); or console.log(2 and get them.
Like this one.
* store['separated key']);
1.1.6.3 variables example
Check out this test example test to see it working.
1.1.7 Content File Injection
You are able to inject file content into a task/actuator/sensor field.
file: <<file://path/to/file.txt>>
Other than that, enqueuer can read it and parse its content as an object using this familiar syntax: <<tag://path/to/file?query=value&other=true>>.
task:
    json: <<json://path/to/file.json>>
    yml: <<yml://path/to/file.yml>>
    csv: <<csv://path/to/file.csv?header=true&delimiter=;>>
    file: <<file://path/to/file.txt>>
Once the object is parsed, your free to use it as a regular object in any event
onInit:
    script: console.log(task.yml.deep.field);
onFinish:
    assertions:
    -   expect: json.key
        toBeEqualTo: csv[0].key
It gets even better.
Due to its fantastic plugin architecture design, you can extend its default modules and use any of these plugins or event write your own to parse however you want.
The built-in modules for object parsers are: json, yml, csv and file.
Run $ nqr -e to see available ones.
1.1.7.1 content file injection example
Check out this test example test to get a full picture of it.
1.1.8 Plugins
You're probably aware by now but it doesn't hurt do emphasize it: enqueuer provides an amazingly powerful plugin extensible architecture. It has several plugins available, but if none of them pleases you, you're free to create your own. Albeit you don't have to share the one you created, we encourage you to do so. Then go ahead and publish yours to npm and add it to our plugins repository.
1.1.8.1 plugin types
So far, you're able to extend enqueuer default behavior in four ways. Using a protocol plugin, an object parser plugin, an asserter plugin and using a report formatter plugin.
1.1.8.1.1 protocol
A protocol plugin enables you to use a different actuator/sensor types.
Run $ nqr -p [protocol-name] to get the full available list:
actuators:
-   name:                  custom
-   name:                  file
-   name:                  http
    messageReceivedParams: statusCode, statusMessage, body
-   name:                  stdout
-   name:                  tcp
-   ...
sensors:
-   name:                  custom
-   name:                  file
    messageReceivedParams: content, name, size, modified, created
-   name:                  http
    messageReceivedParams: headers, params, query, body
-   name:                  stdin
-   name:                  tcp
    messageReceivedParams: payload, stream
-   ...
Each one listed above has a respective example in the examples folder. This one, for instance, provides support for amqp protocol, so you can create this actuator and sensor:
actuators:
-   type: amqp
    payload: enqueuermaniac
    exchange: enqueuer.exchange
    routingKey: enqueuer.integration.test.routing.key
sensors:
-   type: amqp
    exchange: enqueuer.exchange
    routingKey: enqueuer.integration.test.routing.#
    onMessageReceived:
        assertions:
        -   expect: payload
            toBeEqualTo: "'enqueuermaniac'"
1.1.8.1.2 object parser
An object parser plugin enables you to read and parse files as you wish.
This test example demonstrates how to use it,
Run $ nqr -e [object-parser-name] to check available ones:
parsers:
- yml, yaml
- json
- file
- csv
This one, for example, provides the ability to read xml files and inject their values like this:
xmlContent: <<xml://path/to/xml/file.xml>>
1.1.8.1.3 asserter
An asserter plugin provides you a nicely way to use different assertions than these built-in ones.
asserters:
-   expect:
        required:    true
        type:        string, array
        description: actual value
    not:
        required:    false
        type:        null
        description: negates
    toContain:
        required:    true
        type:        string, any
        description: element
Looking at the asserter above, we can create assertions like these:
assertions:
-   expect: ["'a'", 1, true]
    not:
    toContain: "'b'"
-   expect: ["'a'", 1, true]
    toContain: 1
Run $ nqr -t to get the full available list.
Consider looking at this test example.
1.1.8.1.4 report formatter
A report formatter plugin gives you the ability to export enqueuer reports the way you want.
Run $ nqr -f [formatter-name] to list available report formatters:
formatters:
- console, stdout
- json
- yml, yaml
Consider looking at the example of configuration file to see it in use. This one, for instance, generates xUnit like reports from enqueuer's output.
1.1.8.2 plugins list
Enqueuer community offers support to the following plugins:
Author
Name
Description
Want to see yours here too? Write your own and make a PR here.
1.1.8.3 plugins installation
In order to enqueuer get awareness that you want to use a plugin, you have to tell it, right? You can tell enqueuer to use a plugin in three different ways: using it as a command line argument, through the configuration file or letting enqueuer finding it in a default location.
1.1.8.3.1 use plugins via command line
Tell enqueuer to use your plugin through command line this way $ nqr -l <plugin-folder> -l <another-plugin-folder>.
Where plugin-folder and another-plugin-folder are the directories where the plugins are installed in.
1.1.8.3.2 use plugins via configuration file
Tell enqueuer to use your plugin through configuration file this way:
plugins:
-   plugin-folder
-   another-plugin-folder
Where plugin-folder and another-plugin-folder are the directories where the plugins are installed in.
1.1.8.3.3 implicitly
When enqueuer runs, it looks for modules in its same installation directory or in "'.nqr'" folder in the home directory, a.k.a. ~/ folder in linux distributions. Therefore, if you run:
npm install --global enqueuer
mkdir ~/.nqr
cd ~/.nqr
npm install enqueuer-plugin-amqp
nqr -p amqp
Or
npm install --global enqueuer enqueuer-plugin-amqp
nqr -p amqp
You'll see that the enqueuer-plugin-amqp plugin will be loaded.
Every enqueuer compatible module gets implicitly loaded.
In order to be enqueuer compatible, a module has to have an entryPoint exported function in its main file and, its package.json file has to have either enqueuer or qr as keywords.
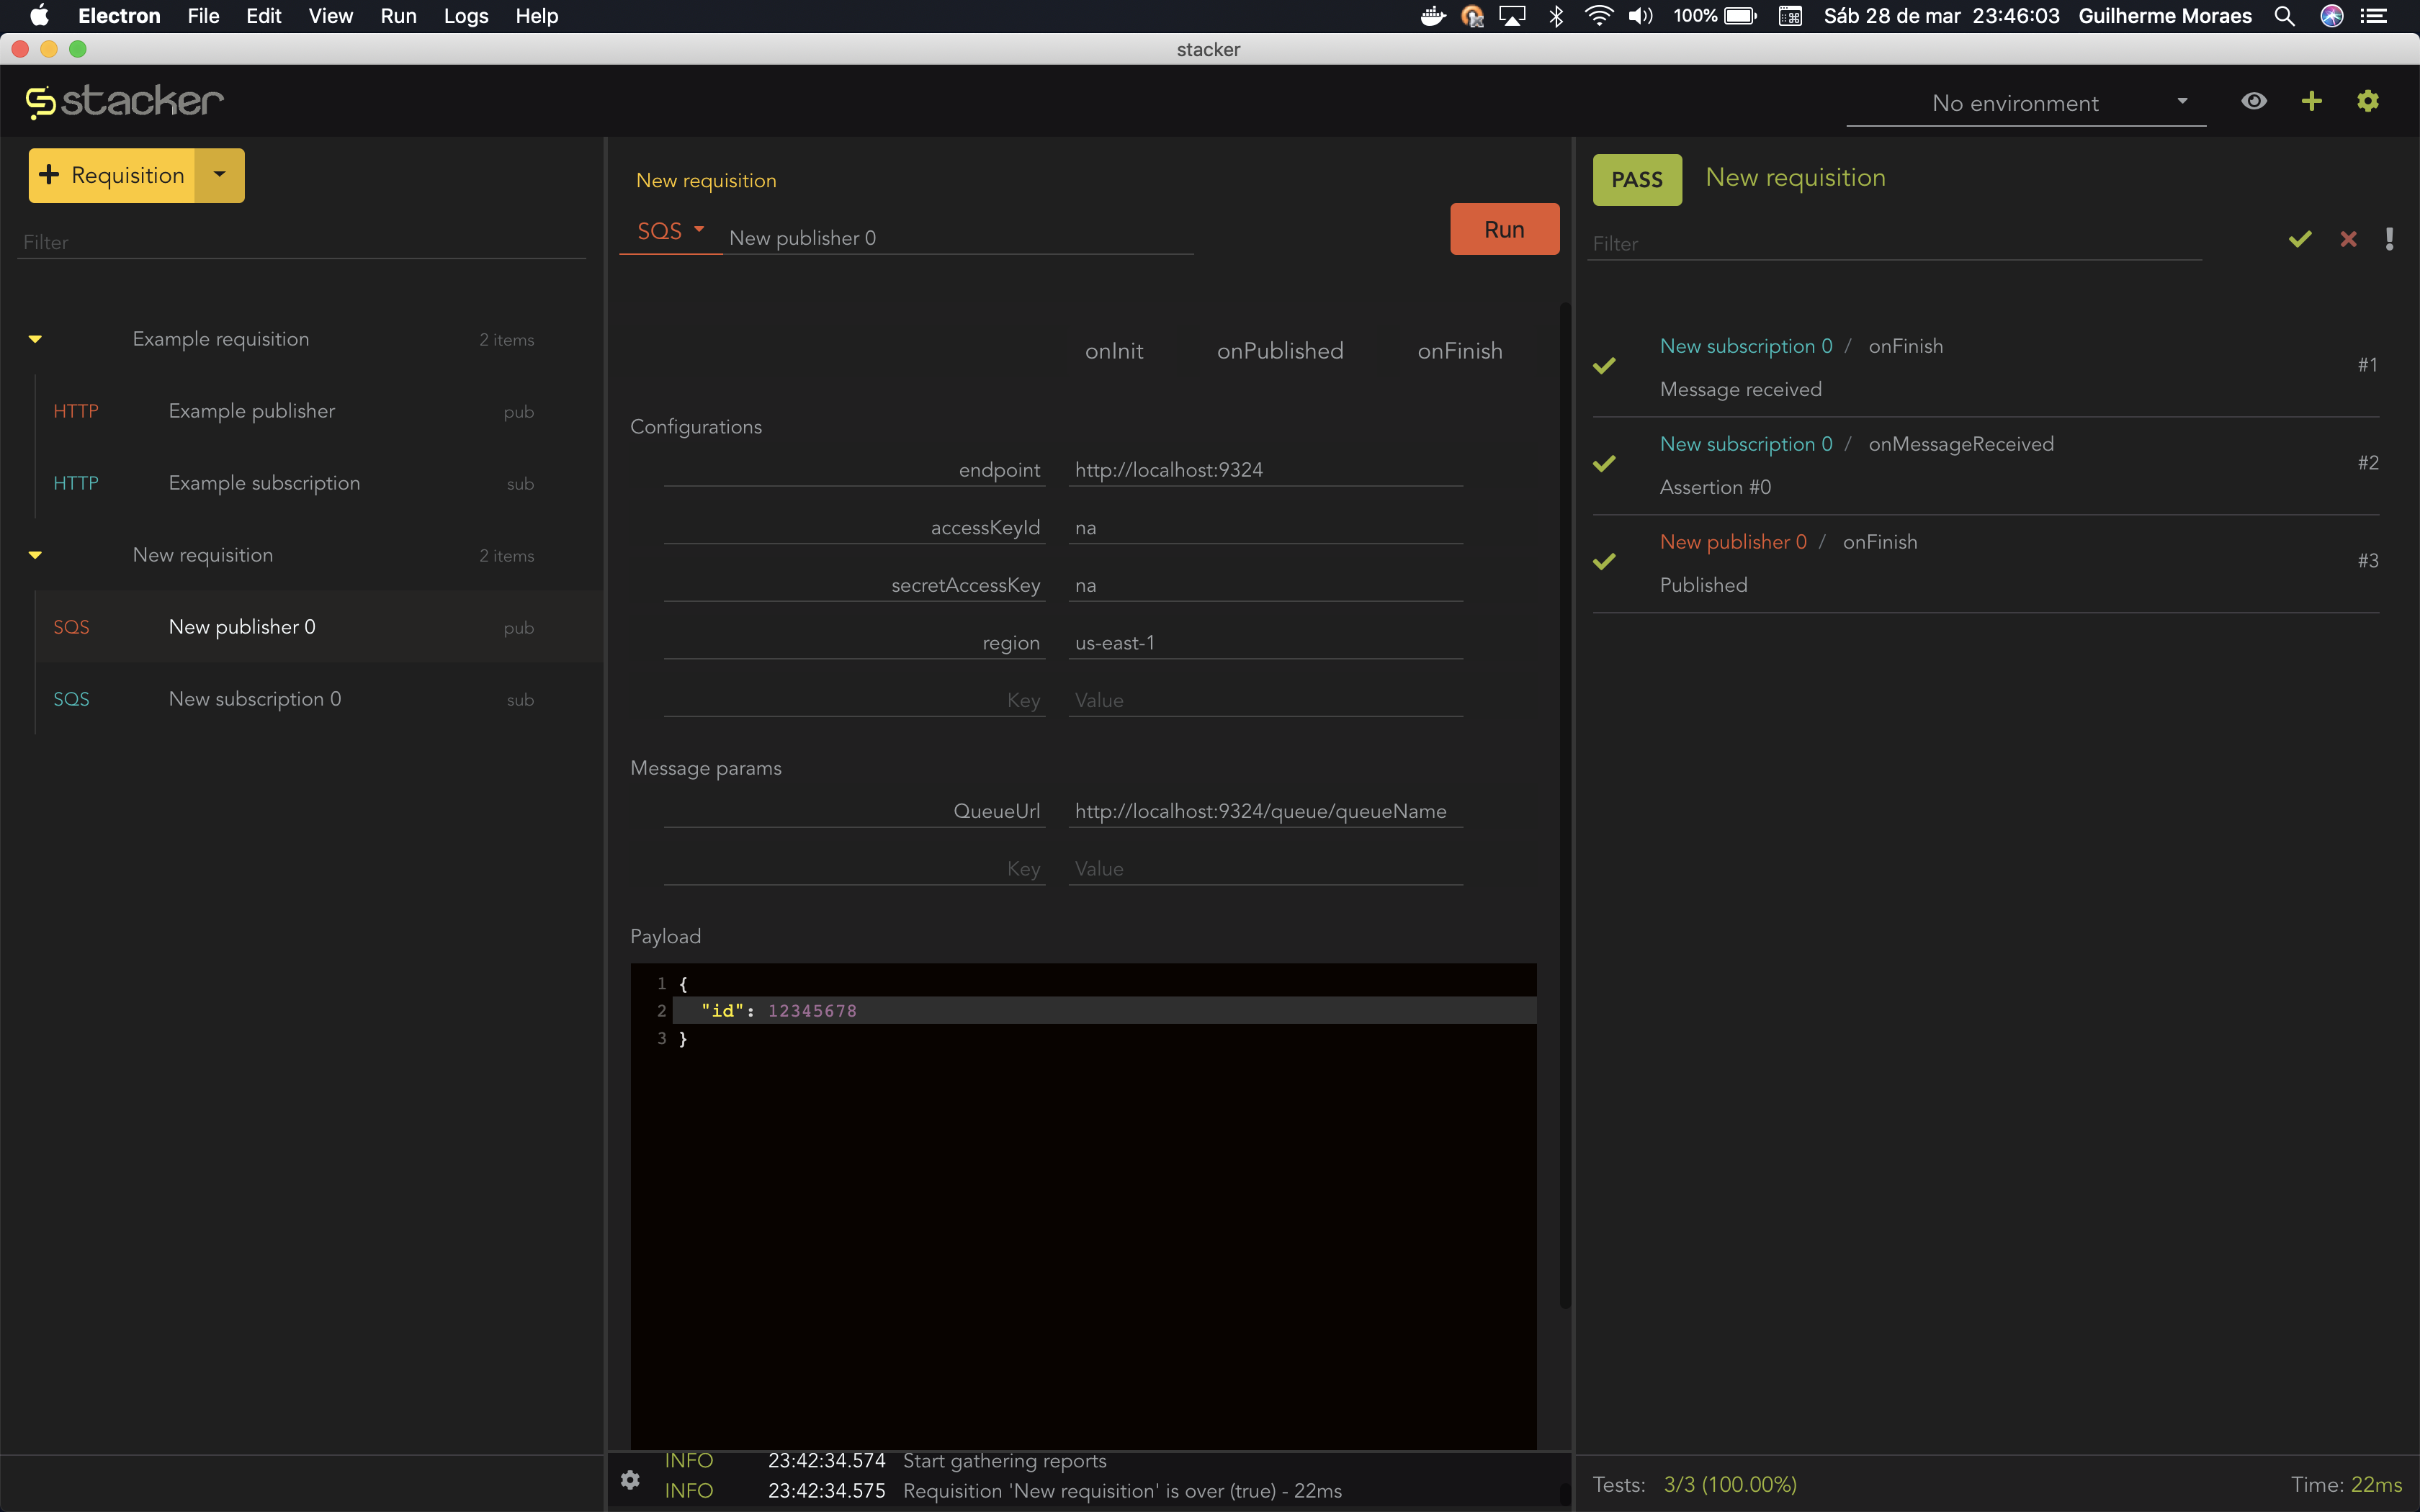
1.1.9 Stacker
Looking for an human error proof solution way of writing these task files?
Consider taking a look at stacker: open source, cross-platform, multi protocol client testing tool.
The official enqueuer's best friend forever. Do amazing things and change the world with enqueuer’s GUI!
With them, you create, manage and run tasks and and see their results in a really nice way.
See this amazing beauty with your own eyes to get an idea of how it works:
1.1.10 Open source
We (by 'we' we mean enqueuer's maintainers not the human race, unfortunately) are very opened to any kind of contributions in general. As long as they make sense and add value to the product, you're free to go. We mean it, do it. Even if it's a typo fix in this README file. Go ahead. If you like it but don't want to waste time creating a pull request, no problem either. Create an issue, or, even easier, give it a github star. It's cheap and it doesn't hurt anyone. You know what? Just head up to enqueuer's github repo and keep staring at its repo. It may help somehow.
1.1.10.1 contributors
Thanks goes to these wonderful people:


It sounds cliché, but this project wouldn't be the same without the massive contribution of everyone.
1.1.10.2 code it
In order to contribute with some code, you have to follow a few steps. First of all, get the code:
git clone git@github.com:enqueuer-land/enqueuer.git
cd enqueuer
Get its dependencies installed:
npm install
Build it:
npm run build
Go for it. Make the changes you want. After everything is done:
npm run all
Commit it:
npm run commit
Push it:
git push
1.1.10.3 feedback
We'd love to get your feedback! If you have any comments, suggestions, etc. you can reach us here.
